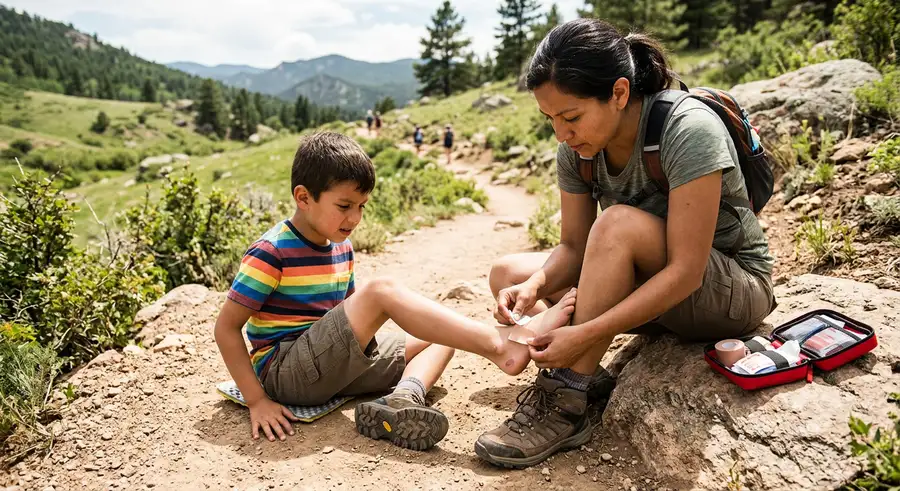
Understand What a Blister Is Before You Treat It
A blister is your body's response to friction. Repeated rubbing between your skin and sock (or boot) causes the outer skin layers to separate, and the gap fills with fluid, lymph, that cushions the damaged area. That fluid is sterile initially. The blister itself isn't the injury; it's the protection. The injury is the friction damage underneath.
Knowing this changes how you treat it. The goal isn't to get rid of the blister, it's to reduce the friction that caused it and protect the area so you can keep moving without making it worse.
Assess the Blister Before Doing Anything
Before opening your first aid kit, figure out what you're working with. Treatment depends on blister status:
- Intact blister, small (under 5mm), no immediate pain, leave it alone. Clean and cover with Leukotape or a blister bandage and keep hiking. Intact blisters with no pressure are best left unpopped.
- Intact blister, large or painful, drain it. The pressure is the problem. Follow the draining steps below.
- Already popped blister, skin flap still attached, clean it, leave the skin flap as a natural cover, and protect with Leukotape or moleskin. Do not remove the flap.
- Open blister, skin fully torn away, treat as a small wound. Clean with water or antiseptic, cover with antibiotic ointment and a non-stick dressing, secure with Leukotape.
- Blood blister, do not drain. Blood blisters are deeper and draining them increases infection risk significantly. Pad around the blister to relieve pressure and keep hiking.
How to Drain a Blister on Trail
If the blister is large enough that leaving it intact would cause more damage from pressure, or if it will obviously pop on its own within the next mile, drain it under controlled conditions.
What you need
- A needle or safety pin (sterilized)
- Alcohol wipe or antiseptic
- Clean gauze or cloth
- Leukotape, moleskin, or blister bandage
- Antibiotic ointment (optional but helpful)
Step 1: Clean the area
Wipe the blister and the surrounding skin with an alcohol wipe. If you don't have an alcohol wipe, use clean water. Don't drain a blister in the middle of a muddy creek crossing with dirty hands.
Step 2: Sterilize the needle
Heat the needle tip with a lighter until it glows, let it cool, or wipe it with an alcohol wipe. A clean needle significantly reduces infection risk.
Step 3: Pierce at the edge, not the center
Insert the needle at the outer edge of the blister, parallel to the skin, not perpendicular. Puncture at the edge rather than the top, this creates a drainage hole while keeping the roof of the blister (the protective skin layer) intact. Make 2–3 small holes around the perimeter.
Step 4: Drain and leave the roof
Gently press the fluid out using clean gauze or cloth. Don't squeeze hard, just gentle, even pressure. When the fluid is out, the blister roof will collapse flat. Leave it there. The roof protects the raw skin underneath. Do not cut it off.
Step 5: Apply antibiotic ointment and cover
A small amount of antibiotic ointment (Neosporin or generic triple antibiotic) reduces infection risk and keeps the roof from sticking to the dressing. Cover with a non-stick pad or the gauze side of a blister bandage.
The Best Field Dressings for Hiking Blisters
Leukotape P
The single best blister management tape available. It's a rigid sports tape with an extremely aggressive adhesive, it won't slide around inside your boot the way moleskin can. Cut it slightly larger than the blister, round the corners (square corners peel faster), and apply to dry skin. It stays on for 2–5 days through sweat and shower. Serious hikers carry a short strip of it pre-cut and wrapped around a trekking pole for access without unpacking everything.
Moleskin (the donut method)
Classic blister padding. Cut a circle of moleskin larger than the blister, then cut a smaller circle from the center, creating a donut shape. Place the donut around the blister so the raised moleskin walls take the boot friction instead of the blister. Cover the hole with a thin gauze pad or second skin. The donut approach is better than covering directly over the blister, which creates a lumpy pressure point.
Compeed / Blister Bandages
Hydrocolloid gel bandages (Band-Aid Advanced Healing, Compeed) create a moist healing environment that dramatically speeds recovery. They're bulkier than Leukotape but better for raw, open blisters. Let them fall off on their own, peeling them prematurely tears the healing skin underneath.
Second Skin (Spenco)
A water-based gel pad that cushions and cools hot spots and open blisters. Very comfortable for raw blisters, but it needs to be secured with tape over it since it has no adhesive backing.
Managing a Torn or Open Blister
If the blister has already torn and the skin flap is hanging:
- Clean the wound with water, pour it over the area, don't rub.
- Flatten the skin flap back over the raw area. It's not cosmetically pretty, but it's the best wound covering available in the field.
- Apply antibiotic ointment directly to the raw area and over the skin flap.
- Cover with a non-stick pad, then secure with Leukotape.
- Change the dressing at least daily and watch for signs of infection: increasing redness spreading from the site, warmth, pus, or red streaking (which indicates lymphangitis, seek medical care if you see red lines spreading up the foot).
Getting Through the Rest of the Day
Once the blister is treated, fix what caused it before putting your boot back on. A blister that formed is going to reform unless the friction is addressed.
- Adjust lacing. The lacing technique that caused a heel blister (heel lift) is the heel-lock lace. The lacing technique for toe blisters often involves too-tight forefoot pressure, loosen the toe box.
- Add or change your sock. Wet socks cause blisters faster than dry ones. If your socks are soaked with sweat, change them. A dry pair mid-day is worth carrying even on a day hike if you're prone to blisters.
- Drain doesn't hurt. Repeat draining may be needed if the blister refills over the next few miles. Re-drain at camp using the same technique.
What to Carry for Blister Management
A complete blister kit weighs under 2 oz and fits in a small zip bag:
- Leukotape P (wrap a 12-inch strip around a short section of trekking pole)
- 2–3 moleskin patches or Compeed bandages
- 2 safety pins or a lancet
- 3–4 alcohol wipes
- Small tube of antibiotic ointment
- Non-stick gauze pads (3–4)
- Body Glide stick (preventive, apply before hiking to friction-prone spots)


