The Problem with Pre-Built First Aid Kits
The $25 pre-assembled first aid kits at camping stores are designed for car camping and general emergencies. They contain things you'll never use on trail (triangular bandages, latex gloves for surgical prep) and leave out things you'll constantly reach for (blister treatment, athletic tape, pain relievers appropriate for hiking). They're also full of redundant items, 40 adhesive bandages when you'll use 2, that add weight without adding capability.
A well-built hiking first aid kit is lean, specific to the hazards you'll actually encounter, and backed by knowledge of how to use each item. This guide covers two kit configurations, day hike and backpacking, with specific items, quantities, and the skills that make them effective.
The Core Hiking First Aid Skills (Gear Is Secondary)
Before the gear list: the most valuable thing you can do for trail safety is take a Wilderness First Aid (WFA) course. A 2-day WFA course teaches you to assess injuries, improvise treatment with limited supplies, and make evacuation decisions, the critical skill set that determines whether your first aid kit saves someone or sits unused while things get worse.
At minimum, understand these scenarios before going into the backcountry:
- How to assess and splint a sprained ankle
- Signs of serious altitude illness (HACE/HAPE) and when to descend immediately
- Signs of heat stroke vs. heat exhaustion and response protocols
- How to control severe bleeding
- How to recognize and respond to anaphylaxis (severe allergic reaction)
NOLS, SOLO, and REI all offer WFA courses. Take one before your first serious backcountry trip.
Day Hike First Aid Kit (Under 6 oz)
For day hikes on well-traveled trails with reasonable cell coverage, the kit should handle the most common injuries (blisters, minor cuts, sprains) and provide stabilization for more serious injuries until help arrives.
Blister and Foot Care
- Leukotape P, wrap 12 inches pre-cut around a short section of trekking pole
- 3–4 moleskin patches
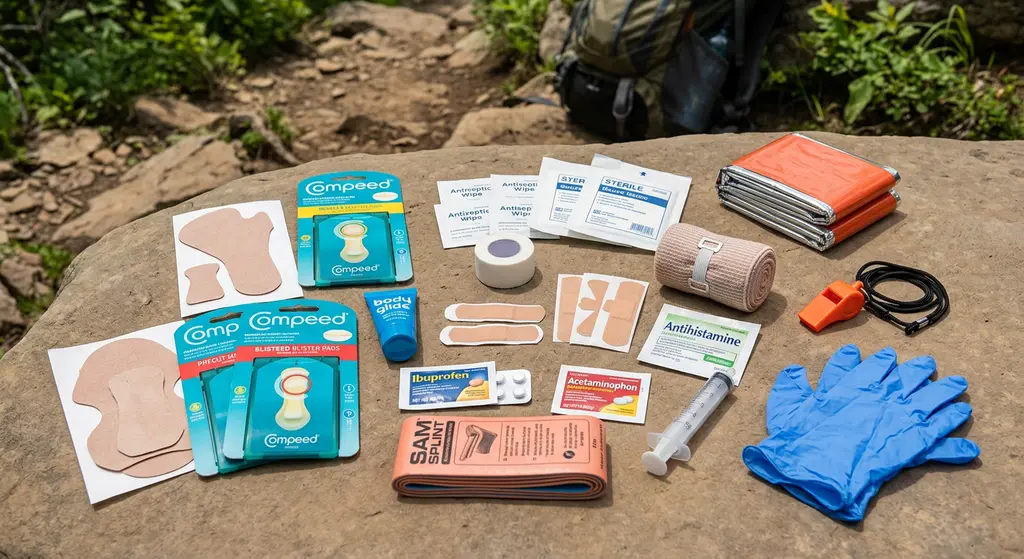
- 2 Compeed/blister bandages
- Body Glide stick (preventive, apply before hiking)
- 2 lancets or safety pins (sealed)
- 3 alcohol wipes
Wound Care
- 4–6 adhesive bandages (assorted sizes)
- 2 sterile gauze pads (2x2 and 4x4)
- Small tube of antibiotic ointment (Neosporin generic)
- Medical-grade tape, 1-inch wide, 1 yard (Medipore or cloth tape)
- 2 butterfly closures / steri-strips (for deeper cuts)
Medications
- Ibuprofen, 6–8 tablets (anti-inflammatory for pain and swelling)
- Acetaminophen, 6–8 tablets (pain relief when anti-inflammatory isn't appropriate)
- Benadryl (diphenhydramine), 4 tablets (mild allergic reactions, though not for anaphylaxis)
- Immodium, 2 tablets (GI issues on trail are miserable)
- If you have a bee sting allergy: carry your prescribed epinephrine auto-injector (EpiPen) and know how to use it
Tools and Miscellaneous
- Emergency mylar space blanket, treat shock, prevent hypothermia
- Small folding scissors or trauma shears
- Tweezers (splinters, ticks)
- Nitrile gloves, 1 pair (blood-borne pathogen protection)
- SAM splint, foldable foam and aluminum splint for finger, wrist, or ankle
Backpacking First Aid Kit (Under 12 oz)
For multi-day trips where evacuation may take 12–48+ hours, the kit needs to handle more scenarios and provide longer-term management of injuries. You're adding capacity to manage wounds for days, not hours.
Everything in the day hike kit, plus:
Wound Care Additions
- Irrigation syringe (10–20ml), clean wounds with pressurized water; critical for preventing backcountry infection
- 4 additional 4x4 sterile gauze pads
- 1 roll of conforming gauze (Kerlix), wound packing and wrapping
- Elastic bandage (ACE wrap), sprain support, pressure dressings, splint securing
- Wound closure strips (6–8), hold larger lacerations closed
- Betadine solution or wound wash (small bottle), wound antiseptic
- Non-stick dressing pads (Telfa, 3–4), covering abrasions and burns
Medications Additions
- Acetazolamide (Diamox), prescription; prevents and treats acute mountain sickness; discuss with your doctor before trips above 8,000 feet
- Ciprofloxacin, prescription antibiotic; for severe GI infection in backcountry; requires prescription and medical discussion
- Ibuprofen, double quantity (12–16 tablets) for multi-day management
- Antacid (Tums), elevation and exertion can trigger acid reflux
Additional Tools
- Second SAM splint
- Trauma dressing or Israeli bandage, serious bleeding control
- Tick removal tool (pointed tweezers work; don't use petroleum jelly or heat)
- Small mirror (signaling and wound inspection)
- Emergency whistle (three blasts = distress signal)
Specific Treatment Notes
Wound Cleaning in the Field
Infection is the primary risk for trail wounds. Clean all wounds aggressively with potable water, the volume and pressure of irrigation matters more than the antiseptic. Fill your irrigation syringe and push water through the wound at pressure to flush out debris and bacteria. This hurts. Do it anyway. A 20ml syringe pushed hard produces adequate cleaning pressure. After irrigation, apply antibiotic ointment and cover with a non-stick pad.
Sprains
The RICE protocol (Rest, Ice, Compression, Elevation) is the field treatment. The key item you have is the elastic bandage for compression and SAM splint for stability. Wrap the ankle from the toes upward in an overlapping spiral pattern, firmer below, looser above. A properly wrapped ankle can often support continued hiking to the trailhead, not ideal, but possible. Severe sprains (inability to bear any weight, significant deformity) are fracture-suspicious and require evacuation.
Altitude Illness
Above 8,000 feet, know the symptoms: headache, nausea, fatigue, dizziness, difficulty sleeping. Mild AMS resolves with rest at the same altitude and ibuprofen. The hard rule for serious symptoms (HACE, confusion, loss of coordination; HAPE, shortness of breath at rest, pink or frothy sputum): descend immediately. Descend is the treatment. No other intervention replaces descent.
Tick Removal
Use pointed tweezers or a tick removal tool. Grasp as close to the skin surface as possible and pull upward with steady, even pressure, no twisting, no petroleum jelly, no matches. Clean the bite area with alcohol after removal. Save the tick in a zip bag for 30 days if you're concerned about disease transmission (allows identification if you develop symptoms).
Pack and Maintain Your Kit
Store everything in a waterproof zip bag or a purpose-built kit bag (Adventure Medical Kits, HART, Fieldtex). Label the bag clearly so others can find it in your pack. Check expiration dates on medications once a year, most are valid 2–4 years from manufacture date. Restock after every trip: items used on trail must be replaced before the next one. Finding your blister kit empty when you need it on mile 2 is entirely avoidable.
Hiking First Aid Kit Essentials FAQs
Build your own, or significantly customize a pre-made kit. Pre-made kits for camping are heavy on items you rarely use (triangular bandages, dozens of small bandages) and light on trail-specific essentials (Leukotape, blister treatment, SAM splint). Start with a good base kit (Adventure Medical Kits Ultralight) and add/remove based on your specific trip and risks.
Knowledge of how to use the contents, but if pressed for one physical item, Leukotape P. It treats blisters, secures dressings, wraps sprains, holds splints in place, and repairs gear. A 12-inch strip weighs almost nothing and solves more trail problems than any other single item.
Acetazolamide (Diamox for altitude) and antibiotics (ciprofloxacin for GI infection) require prescriptions in the US. Talk to your doctor before any trip above 8,000 feet or to remote areas without rapid evacuation. Explain your trip plans, most wilderness medicine-aware physicians are comfortable prescribing these for legitimate backcountry trips.
General rules: evacuate for altered mental status (confusion, disorientation), inability to walk out under their own power, signs of serious infection (spreading redness, red streaks, fever), inability to keep fluids down for 12+ hours, chest pain or serious respiratory distress, and any suspected fracture of a leg bone. When in doubt, evacuate. Self-treatment in serious conditions rarely ends well.
At minimum, a basic wilderness first aid course (2 days) before your first backcountry trip. For extended remote trips (more than 2 days from help), a Wilderness First Responder (WFR) course (8–10 days) is the standard for trip leaders and serious adventurers. CPR/AED certification is also valuable and easy to complete, most gyms and community centers offer it.