Why Trail Markers Matter More Than You Think
Most hikers don't think about trail markers until they can't find one. You're deep in the woods, the trail has faded into a carpet of pine needles, and the last blaze you saw was ten minutes ago. That's the wrong time to learn the system. Understanding how markers work before you hit the trail means you'll recognize when you've drifted off route within a few steps, not after twenty minutes of wandering.
Trail marking systems vary by region, land management agency, and even by the decade the trail was built. But the underlying logic is consistent: markers confirm you're on the correct path and alert you to turns. Once you understand what to look for, reading a trail is as natural as reading street signs.
Paint Blazes: The Most Common Trail Marker
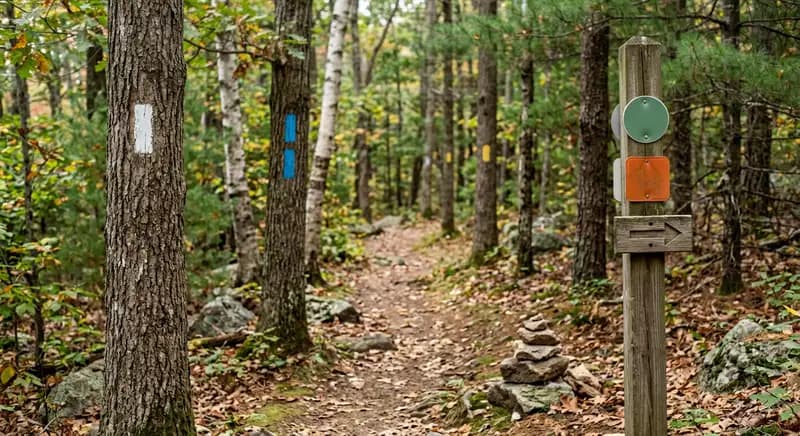
Paint blazes are rectangles of color painted directly on tree bark, typically at eye level (5–6 feet off the ground). They're used on most maintained trails managed by the US Forest Service, National Park Service, and state parks, as well as on major long-distance trails like the Appalachian Trail and Long Trail.
A single blaze means you're on the trail and heading the right direction, keep going. Two blazes stacked vertically (one on top of the other) signal a turn ahead. The position of the upper blaze tells you which direction: if it's offset to the right, turn right; if offset to the left, turn left. You'll usually see this double blaze 20–50 feet before the actual turn, giving you time to slow down and look for where the trail bends.
Different trails use different colors to distinguish between routes that share the same corridor. On the AT, white blazes mark the main trail and blue blazes mark side trails and approach routes to shelters. In state parks, a single color might mark one specific trail while a different color marks another. Before you hike, check the trail map to learn what color corresponds to your route.
When you stop seeing blazes, stop immediately. Don't keep walking, assuming one will appear around the next bend. Backtrack to the last blaze you're confident about, then look carefully in all directions, including up on trees you may have passed. Blazes are sometimes placed on the backside of a tree relative to your direction of travel, which means they're only visible when you turn around to look back.
Blazing Frequency and What It Tells You
Well-maintained trails blaze frequently enough that you should see the next marker from where you're standing, or at least be able to spot it by scanning ahead. In dense forest, this might mean blazes every 50–100 feet. On open terrain like an alpine ridge or a meadow, where the path is obvious, you might go a quarter mile between blazes.
If you're in heavy forest and haven't seen a blaze in more than 200 feet, it's worth pausing to scan the trees at eye level in a 180-degree arc. Blazes can fade, chip off, or be obscured by new bark growth on older trees. On popular trails, worn soil usually confirms you're still on route even when markers are sparse.
Cairns: Stacked Rock Markers
Cairns are intentional stacks of rocks used to mark trails across open terrain where trees are absent: alpine zones above treeline, desert slickrock, and open tundra. They're common in the Rocky Mountains, the desert Southwest (especially in Zion, Arches, and Canyonlands), and above treeline in New England's Presidential Range.
A legitimate navigation cairn is usually 18 inches to 3 feet tall, placed by trail crews at intervals short enough that you can see the next one from the current one. They're often larger and more prominent than the decorative "art cairns" that well-meaning hikers pile up along streams and ridgelines. On trails like the Zion Narrows, cairns are the only markers guiding you through the riverbed, and losing them in poor visibility can get you into serious trouble.
The problem with cairns is that anyone can build one. On popular trails, hikers frequently add cairns in random locations, which can mislead others off the official route. If a cairn doesn't seem to point toward an obvious path, or if it leads you toward a cliff or off-fall zone, be skeptical. Cross-reference with your map or the visible terrain before following it.
In desert canyon country, cairns sometimes mark routes that require technical skill or are scrambles rather than maintained hiking trails. A string of cairns doesn't guarantee the route is safe or appropriate for your skill level, it just means someone has been there before.
Wooden Signs and Signposts
Trailhead signposts and junction signs are your most reliable navigation tools. A standard sign typically shows trail names, distances to key landmarks, and sometimes elevation gain. At junctions, where two or more trails intersect, signs will tell you which direction leads to which destination.
Distances on trail signs are measured in trail miles, not straight-line miles. A sign that says "Summit: 2.4 miles" means 2.4 miles of actual walking along the trail's twists and switchbacks, which could take 1.5 to 3 hours depending on the terrain.
In some parks and wilderness areas, signs are deliberately minimal to preserve the wilderness character. Wilderness designation under the 1964 Wilderness Act actually restricts signage in some zones, meaning you may enter a wilderness area and find no signs at all. This is by design. Download your map and waypoints before you enter these areas.
Carsonite Posts and Other Markers
In the desert Southwest and open rangeland, you'll often see Carsonite posts, flexible brown or green fiberglass posts about 4 feet tall, sometimes with a small reflective panel or a numbered marker. These are common on BLM (Bureau of Land Management) land and in desert national parks where trees aren't available for blazing.
Some trails use posts with a colored disc or an emblem (like a hiker silhouette) rather than paint. National Forest trails often use aluminum diamonds with a hiker symbol nailed to trees. Snowmobile trails use blue diamonds, cross-country ski trails use orange diamonds, if you're hiking in winter, make sure you're following the right color.
Reading the Trail When Markers Are Absent
Even on well-marked trails, you'll encounter gaps. Markers get knocked down by storms, stolen, or simply wear out faster than trail crews can replace them. In these gaps, you navigate by the trail itself.
Look for the worn path: compressed soil, eroded tread, exposed roots from foot traffic. In forest, the understory (shrubs and small plants) is usually absent from the actual trail corridor even when the tread is faint. In open meadows, a slightly greener or more trampled line of vegetation often indicates the path. On rocky terrain, look for the shiniest or most scuffed stones, high-traffic rock shows polish from boot rubber over time.
Switchbacks are another clue. If the slope gets steep and you're walking straight up it, you've probably left a switchbacked trail. Legitimate switchbacks zigzag across the fall line; if you're heading directly up or down a steep pitch without switchbacks, look to your left and right for the actual trail.
Digital Maps and Markers Working Together
Apps like Gaia GPS and AllTrails show your GPS position overlaid on a trail map. When your blue dot drifts off the trail line by more than 50 feet, stop and look around for the marker you missed. These apps don't replace your ability to read physical markers, batteries die, screens go dark in bright sun, and GPS can drift 30–50 feet in heavy tree cover, but they're a powerful second layer of confirmation.
Before any significant hike, download the trail map offline. In areas without cell signal, offline maps work exactly like printed maps but with your live position shown. Mark the trailhead and any key junctions as waypoints so you can navigate back even if the trail looks ambiguous in both directions.
Marking Your Own Path (and Why Not To)
Building unauthorized cairns or marking trees harms the trail ecosystem and can mislead other hikers. Leave No Trace principles specifically discourage building new cairns or adding to existing ones outside of official navigation contexts. If you feel the need to mark your path for the return trip, use a mental note of landmarks ("the big split-trunk pine is on my left heading up") or breadcrumb waypoints on your GPS app. Remove nothing, add nothing.


