Snow and Ice Are Not the Same Problem
Most hikers treat snow and ice as a single issue, but they require different solutions. Deep unpacked snow is an exhaustion problem, your feet punch through with every step and you burn three times the energy of normal hiking. Hard-packed snow is a balance problem, it's slippery but walkable with traction. Ice is a serious hazard, falls on ice are fast and violent, and even a short slide can end with a broken wrist or worse.
Understanding which condition you're dealing with changes how you gear up and how you move. This guide walks through both, plus the hybrid situations you'll encounter most often on winter trails.
Traction Devices: What to Use and When
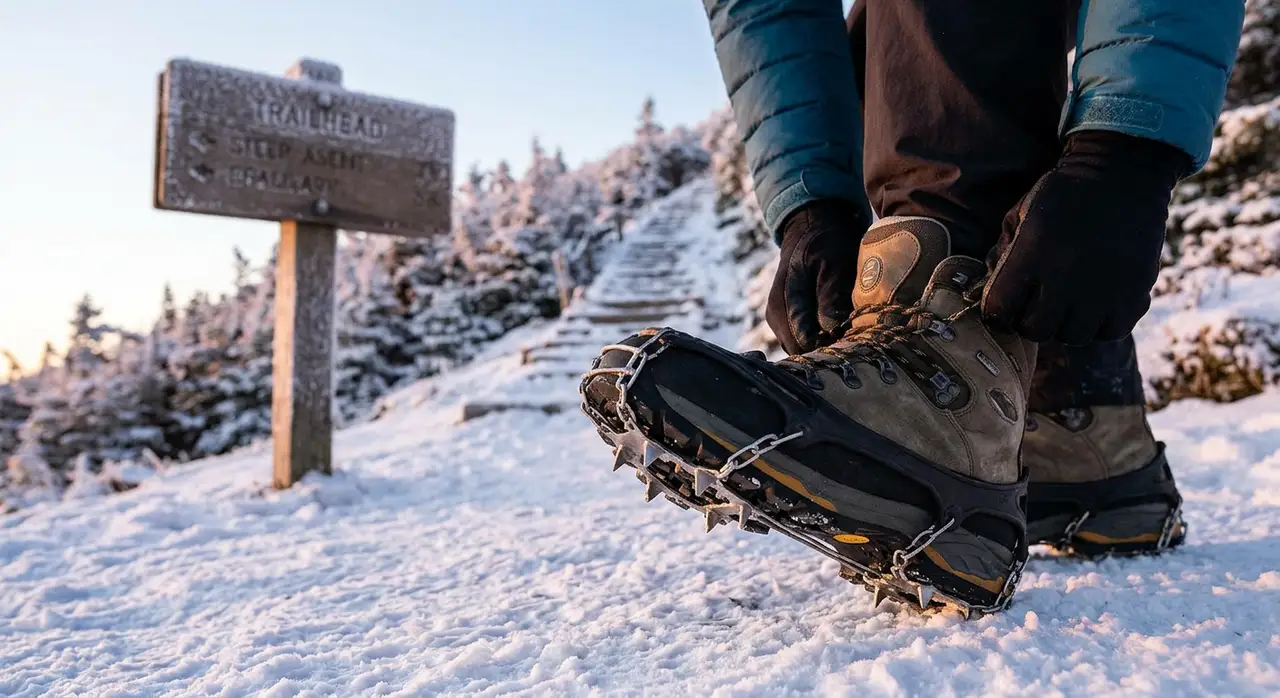
Microspikes are the most versatile traction device for day hikers. They're a rubber harness with a chain mesh of metal spikes that strap over any boot or trail runner. On hard-packed snow, icy trail sections, and frozen stream crossings, they're transformative, you go from shuffling nervously to walking with full confidence. Kahtoola MICROspikes ($80) are the benchmark. YakTrax Run and cheaper alternatives work for light conditions but lose their grip faster and the straps break with hard use.
When to use them: any time you encounter icy trail surface, significant hard-packed snow, or when the trail descends steeply and you can feel yourself slipping. Don't wait until you fall. Put them on preemptively at the trailhead if conditions are likely, or at the first sign of ice.
Crampons are for more serious mountaineering terrain, technical alpine routes, glaciers, and steep couloirs. For most trail hikers, microspikes are sufficient. Full 12-point crampons require compatible stiff-soled boots and a different set of movement techniques. If you're hiking to the top of a 14er in early season or doing any glaciated peaks, look into crampons and a mountaineering course.
Snowshoes solve the postholing problem in deep snow. When the snow is knee-deep or deeper and untracked, every step without snowshoes punches through the crust and costs significant energy. Snowshoes distribute your weight over a larger footprint so you float on top. MSR Evo Trail and Atlas Treeline are both solid beginner options. They're slower and more awkward than normal walking, but they make deep-snow terrain manageable. Most snowshoes now come with built-in crampon bars for icy conditions as well.
Trekking poles are more important in winter than summer. They give you two extra points of contact, help with balance on icy descents, and let you test snow depth and surface hardness before you commit your full weight. Switch from rubber tips to metal tips in winter, rubber grips less on snow and ice.
Movement Technique on Snow
Your movement patterns need to change in snowy and icy terrain. The biggest mistake beginners make is walking normally, upright, full-stride, heel-strike, on surfaces that don't support that gait.
On hard-packed snow and ice: Shorten your stride. Plant your whole foot flat rather than heel-striking. This maximizes contact between your boot and the surface. Keep your weight over your feet rather than leaning forward or back. When going uphill, kick your toe into the snow surface with each step to create a small step. Move deliberately and pause before committing to each step on steep sections.
On steep icy descents: This is where people fall. Face into the slope on very steep descents, it's counterintuitive but far more secure. Kick your toes in, use your poles for balance, and move one foot at a time. On moderate slopes you can face out, but keep your weight over your heels and take small steps. Never glissade (slide on purpose) unless you know how to self-arrest and you've checked what's below you.
On deep untracked snow: Lift your feet rather than shuffling. The lift-and-plant motion is more efficient than dragging your boots through powder. Let snowshoes do the work of keeping you on the surface, if you're postholing with snowshoes on, the snow is too soft and you may need to wait for it to firm up or turn around.
Traversing a slope: When crossing a slope diagonally (traversing), kick the uphill edge of your boot into the snow to create a small shelf with each step. Microspikes help enormously here. If the slope is steep enough that you feel unstable during a traverse, face into the slope and kick both feet in.
Reading Snow Conditions
Not all snow is created equal. Learning to read what's underfoot helps you make better decisions about when to put on traction, when to turn around, and when the terrain is safe.
Consolidated morning snow: The best conditions for hiking. Overnight cold firms up the snow surface, giving you a platform that holds your weight. Microspikes work well here. This is why experienced winter hikers start early, by mid-afternoon, warmer temperatures soften the snow and conditions deteriorate.
Afternoon suncup snow: Warmer afternoon temperatures soften snow that's been in the sun. Suncups, bowl-shaped depressions, form on south-facing slopes. Your foot breaks through unpredictably, making progress frustrating and tiring. On steep slopes, softened snow is an avalanche risk.
Wind slab: Wind deposits snow into firm, dense slabs on lee slopes (the side away from wind). Wind slab makes a hollow sound when you tap it, breaks into blocky chunks when it fails, and can slide as a unit. Avoid steep slopes with wind slab, especially after heavy snowfall or high winds.
Ice: Ice forms on trails where water flows and refreezes, under bridges, at stream crossings, and on north-facing slopes that never see sun. It looks dark and wet but is rockhard. Microspikes are essential. Test suspected ice sections with your pole before stepping.
Avalanche Awareness for Trail Hikers
You don't need to be doing technical mountaineering to encounter avalanche terrain. Any trail that passes through open bowls, crosses below steep slopes, or travels through mountain terrain can put you in the runout zone of a slide.
The key risk factors are: slopes between 30 and 45 degrees, recent heavy snowfall (within 24–48 hours), warming temperatures after cold loading, and wind-deposited snow on lee slopes. Check the local avalanche forecast at avalanche.org before any mountain hike. The forecast maps show you which aspects and elevations are at what danger level.
As a beginner, the simplest rule is: avoid open steep slopes and terrain directly below them in the days after significant snowfall. Stick to forested terrain or ridgelines where avalanche risk is lower. When in doubt, turn around, no summit is worth a burial.
What to Do If You Slip
Even with microspikes, you can slip on ice or lose your footing on a steep traverse. The instinctive reaction, reaching out with your hands, often leads to a broken wrist. Train yourself to do this instead: tuck your chin, keep your arms close to your body, and try to arrest your slide by digging your heels and elbows in. On steep icy terrain with real exposure, carry an ice axe and know how to self-arrest before you need it.
The better approach is prevention: slow down before you feel unstable, put on microspikes before you reach icy sections, and turn around if the terrain exceeds your equipment or comfort level. The mountain isn't going anywhere. A conservative decision today is always the right call.


