The Core Problem with Hiking with a Camera
Cameras that are easy to shoot are hard to hike with, and cameras that are easy to pack are hard to shoot with. The ideal hiking camera system solves the tradeoff: accessible enough to shoot spontaneously, secure enough to not slow you down, and protective enough to survive real trails. There's no universal answer, the right system depends on your camera size, how technical the terrain is, and how many shots you're actually going to take.
Chest Harnesses
Chest harnesses (like the Spider Holster X-System or Capture Camera Clip harnesses) hold the camera at mid-chest, accessible with one hand without removing your pack. For photographers who shoot frequently, every quarter mile or more, this is the most practical system. The camera stays secure against your torso, doesn't swing, and doesn't get in the way on technical terrain.
The drawback: wearing a camera plus a full backpack plus a chest harness is a lot of gear. In hot weather this can get uncomfortable. And on scrambles where you need both hands and your chest against rock, a camera at your sternum is in the way. If most of your hiking is trail hiking (not technical), a chest harness is hard to beat.
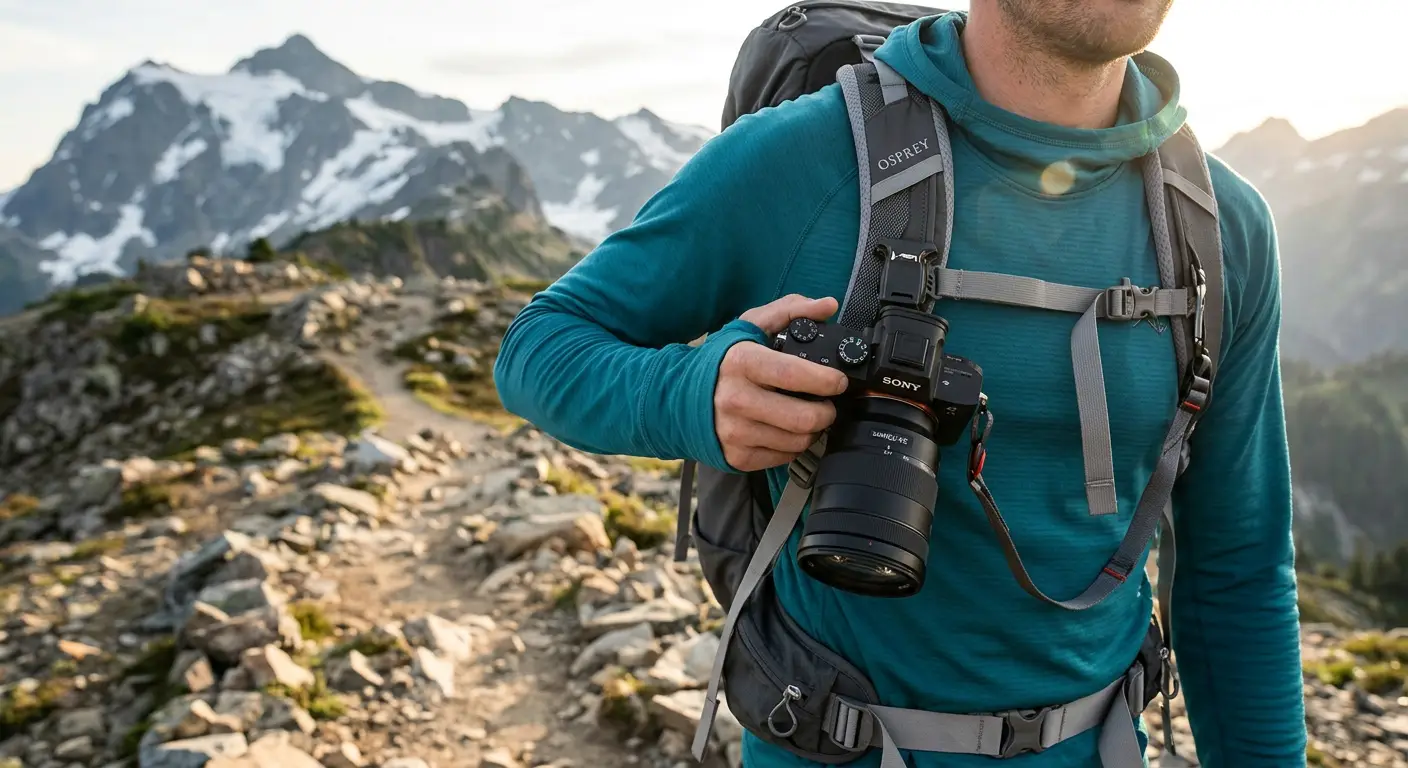
Peak Design Capture Clip
The Peak Design Capture Clip mounts directly to a backpack shoulder strap and allows fast one-handed camera attachment and release. It's lighter than a full harness, adaptable to most backpacks, and keeps the camera high enough on your body to grab quickly. Many backpacking photographers use this as their primary system.
It works best with smaller mirrorless cameras (Sony A7 series, Fujifilm XT series, etc.) and less well with heavier DSLRs. The camera does stick out from the shoulder strap and can catch on brush or doorframes if you're not paying attention. Use the included strap as a safety leash so if the clip fails, you don't lose the camera down a slope.
Hip Belt Attachments
Several companies make pouches or quick-draw holsters designed for pack hip belts. These work well for compact mirrorless cameras and keep the weight low on your body. The downside is that hip belt access requires looking down, and the camera isn't as quick-draw as a chest or shoulder mount. For casual hiking where you stop to take photos rather than shoot on the move, hip pouches are comfortable and protective.
Sling Bags and Camera Backpacks
A camera sling bag (a single-strap bag that swings from back to chest) lets you carry your camera fully protected and access it quickly by rotating the bag forward. Brands like Lowepro and F-Stop make sling bags designed for hiking, padded dividers, weatherproofing, and enough volume for a water bottle and layers alongside the camera gear. This is the best option when you're carrying multiple lenses or want maximum protection in wet conditions.
Dedicated camera backpacks (like the Shimoda Action X series or Lowepro Flipside) are the choice for serious photographers who are also serious hikers. They carry cameras as the primary cargo with an integrated dry bag or weather cover, hip belt load transfer, and usually space for a hydration reservoir. They're heavier than sling bags but handle full camera kits.
Protecting Your Camera in Bad Weather
Weathersealed mirrorless bodies (Sony A7III+, Fuji X-T4, Canon R series) handle light rain without any extras. For heavier rain or dusty conditions, a camera rain cover (cheap, weighs almost nothing) adds protection. For the lens, which is almost never weathersealed on consumer zoom lenses, keep a UV filter on at all times and a microfiber cloth accessible for wiping after wet sections.
For water crossings, carry the camera in a drybag or waterproof stuff sack attached to the outside of your pack only for short crossings. Losing a $1,500 camera to a river crossing is a worse outcome than a few difficult minutes of repacking.
Recommended Camera Systems by Hiking Style
Day hikes, frequent shooting: Peak Design Capture Clip on shoulder strap + safety leash. Fast access, minimal weight penalty, works with mirrorless systems.
Backpacking, casual shooting: Padded hip belt pouch or top pocket of pack. Camera stays protected, accessed at rest stops rather than on the move.
Technical terrain, scrambling: Store camera inside the pack on approach, take it out at viewpoints. No system secures a camera safely when your hands are on rock.
Photography-focused trip: Shimoda or Lowepro camera backpack with full weather protection. Prioritize camera safety over hiking efficiency.


